Home › Forum › Ask A Member › 1965 Evinrude Lightwin – Speed Question
- This topic has 32 replies, 14 voices, and was last updated 10 years ago by
fleetwin.
-
AuthorPosts
-
June 16, 2015 at 4:58 pm #18207
Anonymous
quote fleetwin:Just thought of something. Is this a lightwin or a yachtwin? A yachtwin has a right angle drive propeller, someone may have put a yachtwin gearcase on this engine with the larger pitch 5hp prop which the 3hp could never spin up.The photos earlier in this thread seem to show the "weedless" (lightwin/JW) lower unit
June 16, 2015 at 5:05 pm #18209Oh OK, missed that…
Yep, that’s weedless/lightwin gearcase, couldn’t see the prop though. The engine looks like it has seen a hard life, but doesn’t show signs of overheating though.June 16, 2015 at 11:40 pm #18224Hmmmmm……We seem to be almost a full three pages into this and I don’t see the first sign of anyone asking if the engine has enough compression.
Also see several posts on holding a plug against the head but no mention of checking for adequate spark the accepted way…….
Usually Fleetwin and Frank are through all the basics by now when trying to help out.June 16, 2015 at 11:45 pm #18226quote Pappy:Hmmmmm……We seem to be almost a full three pages into this and I don’t see the first sign of anyone asking if the engine has enough compression.
Also see several posts on holding a plug against the head but no mention of checking for adequate spark the accepted way…….
Usually Fleetwin and Frank are through all the basics by now when trying to help out.The guy I bought it from said the compression is "good" and the same on both cylinders.
I just tested the spark on both plugs and they looked nice and blue.
Cory
June 17, 2015 at 1:55 am #18247I added Seafoam and ran it for 20 minutes or so. It seems to be running a "bit" better
https://www.youtube.com/watch?v=-kCpkVk … e=youtu.be
It does seem to "open up" better when I go from "low speed" right to the top end than if I just slow down a bit and then try to open it up (if that makes sense?).
The guy I bought it from said he’ll take a look at it next time I make it to his city (2 hours away) and if he can’t get it fixed, he’ll swap me for another motor.
Cory
June 17, 2015 at 2:07 am #18249Build a JW right and feed it some hot fuel, it should be able to tow skiers or plane a piano. This should also work with a Lightwin.
 June 17, 2015 at 5:29 pm #18280
Papster is right, you can’t build a skyscraper on a sand foundation.
You should definitely check the compression, and the spark should be able to jump a 1/4" gap while cranking.
Like I said, that needle valve looks incorrect, which may be adding to your idling problem. You need to check the throttle plate sycnronization and make sure the butterfly is closing fully (and not binding) at idle as well.
I don’t know how much you paid for the engine, but you might consider the sellers offer of a refund if you/he can not make it idle right.June 18, 2015 at 12:06 am #18313Cowboy, I watched the videos you posted and these are my thoughts.
– Fleetwin is right, the slow speed/idle needle is either out way too far or is an incorrect needle for that motor. It sticks out a good inch from the cowlings.
– Never depend on the previous owners statement that the compression is good. Always check the compression for yourself.
– There is a process for evaluating the motor. If you are willing to take guidance we can help you out to determine what is going on with your motor.
* First thing is to check the compression yourself. Most auto places will loan out a compression tester for a deposit and money is refunding when you return it. Napa, Auto Zone, O’Reilys…etc.
Here is a video to show you how you can test your compression.
https://www.youtube.com/watch?v=PyCw4SiuT2I
Please report back your finds on compression.
**Second phase of diagnostics is to evaluate the ignition.
***Third phase of diagnostics is to evaluate the ignition.By putting the spark plug against the engine block is not adequate assessment of the health of the ignition system. You need to get a spark checker and gap it to at least 1/4 inch. The spark should be able to consistently jump the gap and be strong blue snapping spark.
Here is a bunch of information that you can read and do the repairs yourself and know what is going on.
Here is some information that will help you evaluate your ignition system with the flywheel popped off.
Harmonic balance flywheel puller video
https://www.youtube.com/watch?v=Nz1st4XnsX4
Your going to need to inspect your point, condenser and coils. They are located under the flywheel. Hopefully all you need to do is clean and regap your points and you might be in business. Still check your coils and condensers and plug wires.
Here are two link to show you how to test your coils and condensers.
http://www.youtube.com/watch?v=KT8rk5QWgS0
http://www.youtube.com/watch?v=l6eSXYmENDY
How to replace your coils, points and condenser. Please take digital pictures as you go, so it will help you return everything back in the right order. Keep cheap zip lock bags available to put your parts in so you don’t lose them. They are small.
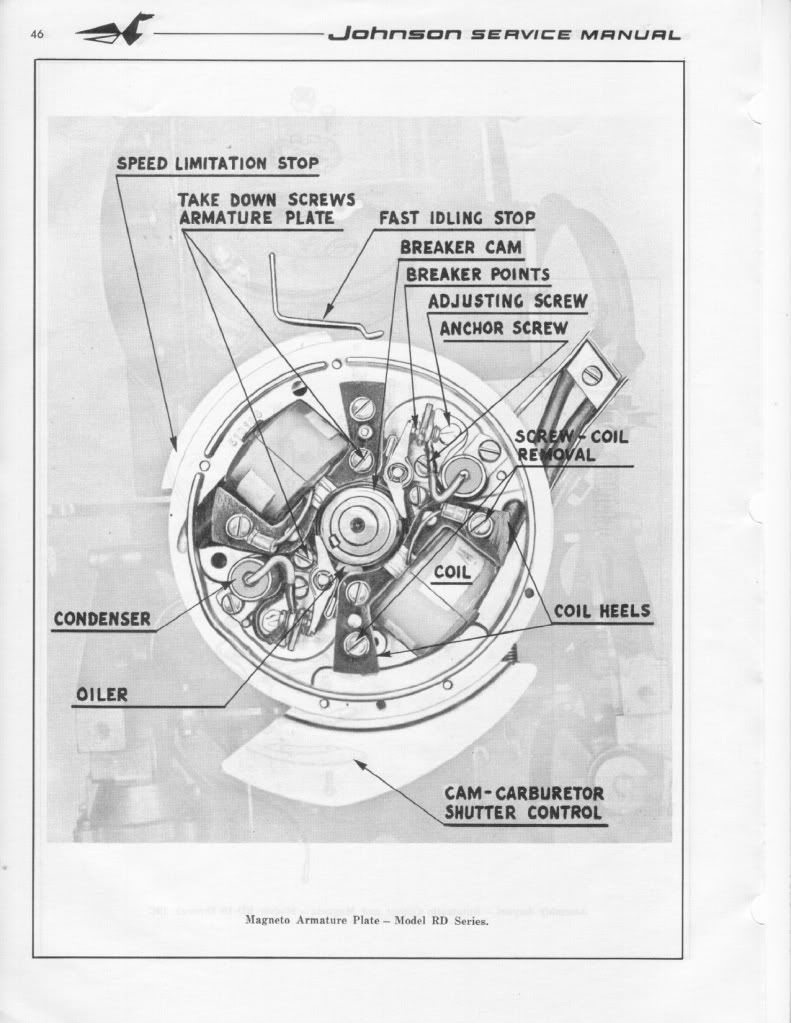
Here is a diagram of a generic OMC (Johnson/Evinrudle/Gale) ignition assembly. You will have to remove the coil designated for the top cylinder and put the oil wicker in. It should be already be coated with a very light oil. (not grease). The purpose of the oil wicker is to lightly lubricate the outside riding surface of the cam so the point shoes do not prematurely wear. If you look at the points they have little shoes that ride along the cam. Please make sure the (breaker)points cam is on the correct side or the ignition will be out of timing. It should have the word top machine written on the side facing up.
FYI: You can only set(gap) one set of points at a time. Put the flywheel nut back on(turn with a wrench or ratchet clockwise) to allow you turn the crankshaft. (Please remove both spark plugs to make it easier to turn the crankshaft and prevent accidental starting)
You gap the point to 0.020 when the point shoes is at the top(high point of the cam). It should have a mark along with the word top. Then you will turn clockwise to the next set of point 180 degrees and set those points the same way. You will notice that the point of the previous set will be closed and when you come around again they will open up. *** When they are open no current is allow through. This is how you set your timing with the points.***
When you go to set the point’s gap. Very gently snug the anchor screw, then adjust the gap with adjusting screw and the feeler gauge until the feeler gauge is sliding through with slight resistance only. Then tighten the anchor screw. Repeat procedure with second set of points. Please make sure your hands are clean and the feeler gauge is clean, because oil on the points can foul them up and create resistance….poor or no no spark. ALways use a spark check to evaluate spark. It should jump minimum 1/4 inch. Blue sharp snappy spark.
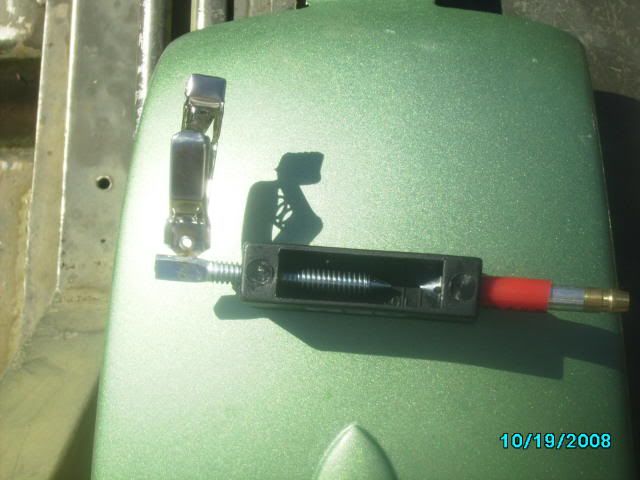
Here is a picture of a spark check…Cheap $6
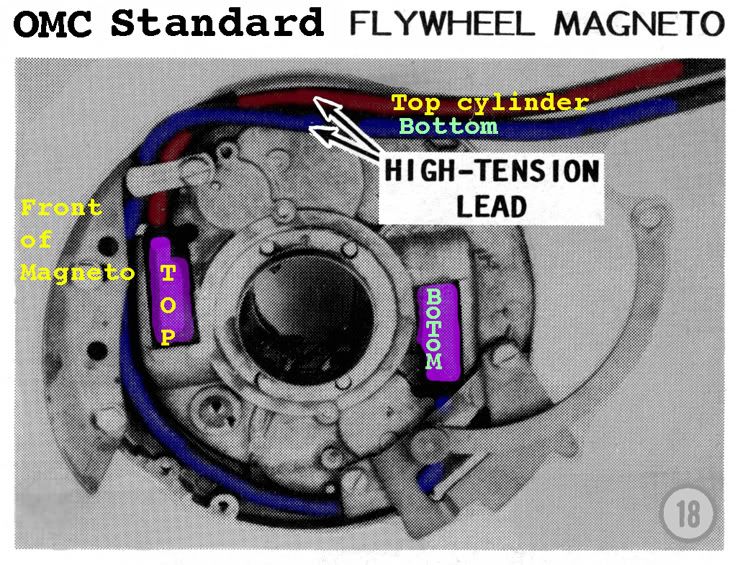
Here is a picture of how to tell which wire is going to the correct cylinder. Thanks to Garry for providing the picture on other post.
If your using the existing wires then cut about 1/4 inch of end going the coil, so you have clean un-oxidized copper contacting the spiking in the coil. Twist the end of the spark plug wire onto the coil spike. If you have replaced the wires, make sure they are 7mm copper metal core and not the automobile stuff.
***** Please make sure two things*****
1.) Make sure all the wires are tucked away under the flywheel and not rubbing up against the cam or crank, because with will eventually get damage and create a short, then no spark!!
2.) Make sure the coil heels (ends) are evenly lined up with the mounting boss.
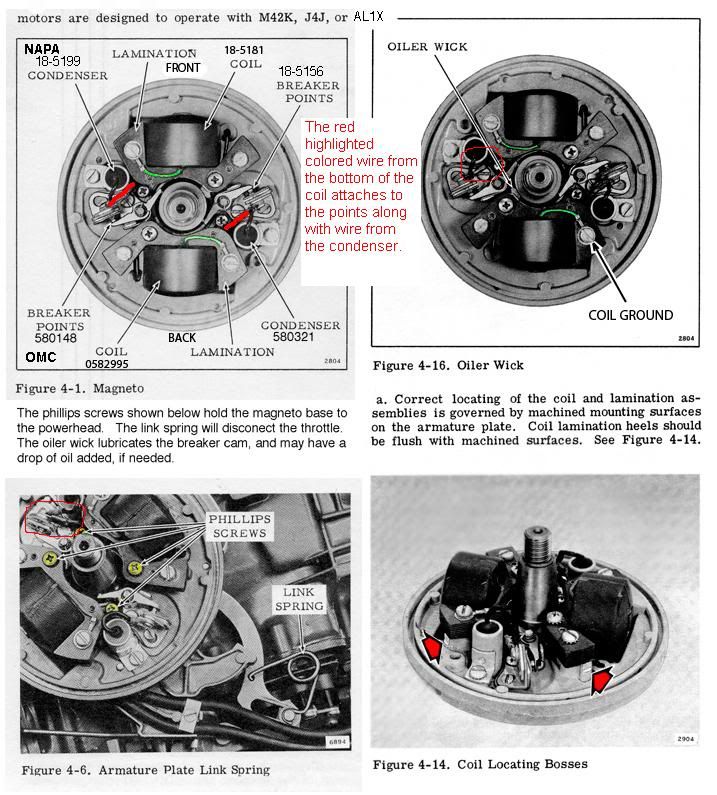
Here are some pictures. (Compliments of JBJennings..nice fella)


Lining up the coil heel with the mounting boss prevent damage of the coils and the flywheel magnet, prevent rubbing as the flywheel turns.
*** Make sure the throttle is advanced to that start position***
Here is another picture that Garry (thanks Garry!!) supplied on another post with some modification.
Both diagrams, should answer your questions.
Here is some you tube videos that can help you diagnosis and properly setting your ignition and clean set your carburetor
Here a bunch of videos that can help you along. They are long and detail, but I purposely made them that way, so someone new to motors would feel comfortable. So, I apologize if they are boring. I originally made those videos to help a guy who had little mechanic knowledge.
Here is a link on how to remove a flywheel.
https://www.youtube.com/watch?v=Nz1st4XnsX4
Here is a bunch of links to evaluate and repair your ignition
If your looking for a help cleaning your points and testing your ignition, then here are some YouTube videos that can help.
Not professional videos, but they can help guide you through ignition diagnostics and repair. The motor in the video is a 1968 Johnson 6hp.
Hopefully will give you a visual and help you some.
Evinrude Gale and Johnson ignition video 1
https://www.youtube.com/watch?v=oTN8Ag_aj-8
Evinrude Gale and Johnson ignition video 2
https://www.youtube.com/watch?v=r7A6d8me0Gw
Evinrude Gale and Johnson ignition video 3
https://www.youtube.com/watch?v=ZAlT32NnTJ0
Evinrude Gale and Johnson ignition video 4
https://www.youtube.com/watch?v=re6FgcB_Yok
Evinrude Gale and Johnson ignition video 5
https://www.youtube.com/watch?v=ClGt6xHnb94
Evinrude Gale and Johnson ignition video 6
https://www.youtube.com/watch?v=taaSzp1Ev-0
Evinrude Gale and Johnson ignition video 7
https://www.youtube.com/watch?v=p7w0xW48YCU
Here is a bunch of links to help you with your carburetor.Here are some videos on how to clean and apply a carburetor kit for an OMC high speed fix jet carburetor. Displayed motors are 1968 Johnson 6hp and 1964 Evinrude 18hp outboards. The videos are very long and over detailed, but I want to help those who are new/novices to motor repair. Again, I am no expert or certified marine mechanic, but I am offering video to help.
OMC fix jet carburetors part 1 of 10 (Motor displayed 1968 Johnson 6hp)
https://www.youtube.com/watch?v=7MmDOaOQyQg
OMC fix jet carburetors part 2 of 10 (Motor displayed 1968 Johnson 6hp)
https://www.youtube.com/watch?v=PuByx8J-EfY
OMC fix jet carburetors part 3 of 10 (Motor displayed 1968 Johnson 6hp)
https://www.youtube.com/watch?v=FpivbGEv0wM
OMC fix jet carburetors part 4 of 10 (Motor displayed 1968 Johnson 6hp)
https://www.youtube.com/watch?v=-aWICvsQZQ8
OMC fix jet carburetors part 5 of 10 (Motor displayed 1968 Johnson 6hp)
https://www.youtube.com/watch?v=JqB6PLqeTI4
OMC fix jet carburetors part 6 of 10 (Motor displayed 1968 Johnson 6hp)
https://www.youtube.com/watch?v=HS5J_AxJrAY
OMC fix jet carburetors part 7 of 10 (Motor displayed 1968 Johnson 6hp)
https://www.youtube.com/watch?v=Iq_2RfWjQ28
OMC fix jet carburetors part 8 of 10 (Motor displayed 1968 Johnson 6hp)
https://www.youtube.com/watch?v=-lXIVBX_UF4
OMC fix jet carburetors part 9 of 10 (Motor displayed 1968 Johnson 6hp)
https://www.youtube.com/watch?v=-nA_4YmNgt8
OMC fix jet carburetors part 10 of 10 (Motor displayed 1968 Johnson 6hp)
https://www.youtube.com/watch?v=94lcU7y2P9Y
Almost forgot to post an accessory video regarding a timing fixture. You can certain set the points with a feeler gauge as shown in the previous videos, but I just wanted to add this to the list.
https://www.youtube.com/watch?v=eNK2TEeQQv0
Carburetor Adjustment for idle/low speed needle. Your carburetor has a high speed fix jet, so no adjustment. It just needs to stay clean.
Initial setting is: Slow speed = seat gently(turn in clockwise), then open 1-1/2 turns(turn out counter clockwise). Do not tighten or force the slow idle needle shut or it may damage the needle.
Start engine and set the rpms to where it just stays running. In segments of 1/8 turns, start to turn the S/S needle valve in (clockwise). Wait a few seconds (10 to 15 sec) for the engine to respond. As you turn the valve in(clockwise), the rpms will increase. Lower the rpms again (turn your throttle slightly slower) to where the engine will just stay running.
Eventually you’ll hit the point where the engine wants to die out or it will spit back (sounds like a mild backfire). At that point, back out(turn out counter clockwise) the valve 1/4 turn. Within that 1/4 turn, you’ll find the smoothest slow speed setting.
When you have finished the above adjustment, you will have no reason to move them again unless the carburetor fouls/gums up from sitting, in which case you would be required to remove, clean, and rebuild the carburetor anyway.
June 18, 2015 at 12:56 am #18318Couple things that have not been mentioned.
Since the idle needle does not appear stock the needle may have been replaced due to grooving of the old needle.
Have found, for the most part, that once a needle has been grooved that the seat is pretty well deformed as well.
Usually when the idle needle seat is deformed a new needle or one that has been turned down will be marginally better but
still difficult to hold a good setting. The setting will drift and require fairly constant adjustment. Is this one of your symptoms?
The engine sounds pretty ratty at idle and is hard to start without choke and plenty of spark. This is why I would suggest the basics (compression, etc.) The engine may have been overheated to the point where pistons were damaged and/or rings are stuck.
Someone HAS asked if the engine is pumping water haven’t they? You DO know where to check? Not going back through three pages to find out.
If stuck mechanically (by piston debris) then Seafoam or whatever magic potion you throw in there will never work. If just stuck badly with carbon the idle will still be affected but you have a chance of cleaning it up.
Would suggest you stop using the little league stuff and go to OMC Engine Tuner or Mercury Power Tune. This is the real deal when it comes to de-carboning. Read the directions and let it sit overnight. Any less and you aren’t doing the engine a favor.
After checking compression you can pull a side cover and see what shape the rings are in. Let us know.
Now…..back to your regularly scheduled troubleshooting.June 18, 2015 at 4:10 pm #18370quote fleetwin:Papster is right, you can’t build a skyscraper on a sand foundation.
You should definitely check the compression, and the spark should be able to jump a 1/4″ gap while cranking.
Like I said, that needle valve looks incorrect, which may be adding to your idling problem. You need to check the throttle plate sycnronization and make sure the butterfly is closing fully (and not binding) at idle as well.
I don’t know how much you paid for the engine, but you might consider the sellers offer of a refund if you/he can not make it idle right.I’m going to have the motor dropped off to him and if he can’t fix it, take an exchange on another motor.
quote Pappy:Couple things that have not been mentioned.
Since the idle needle does not appear stock the needle may have been replaced due to grooving of the old needle.
Have found, for the most part, that once a needle has been grooved that the seat is pretty well deformed as well.
Usually when the idle needle seat is deformed a new needle or one that has been turned down will be marginally better but
still difficult to hold a good setting. The setting will drift and require fairly constant adjustment. Is this one of your symptoms?
The engine sounds pretty ratty at idle and is hard to start without choke and plenty of spark. This is why I would suggest the basics (compression, etc.) The engine may have been overheated to the point where pistons were damaged and/or rings are stuck.
Someone HAS asked if the engine is pumping water haven’t they? You DO know where to check? Not going back through three pages to find out.
If stuck mechanically (by piston debris) then Seafoam or whatever magic potion you throw in there will never work. If just stuck badly with carbon the idle will still be affected but you have a chance of cleaning it up.
Would suggest you stop using the little league stuff and go to OMC Engine Tuner or Mercury Power Tune. This is the real deal when it comes to de-carboning. Read the directions and let it sit overnight. Any less and you aren’t doing the engine a favor.
After checking compression you can pull a side cover and see what shape the rings are in. Let us know.
Now…..back to your regularly scheduled troubleshooting.The low speed idle seemed fine when I had it out fishing and seemed to hold it’s position, but I was only out for a couple hours.
The motor is pumping water. I notice it’s more of a mist than a jet of water, is that right?
quote cajuncook1:Cowboy, I watched the videos you posted and these are my thoughts.– Fleetwin is right, the slow speed/idle needle is either out way too far or is an incorrect needle for that motor. It sticks out a good inch from the cowlings.
– Never depend on the previous owners statement that the compression is good. Always check the compression for yourself.
– There is a process for evaluating the motor. If you are willing to take guidance we can help you out to determine what is going on with your motor.
* First thing is to check the compression yourself. Most auto places will loan out a compression tester for a deposit and money is refunding when you return it. Napa, Auto Zone, O’Reilys…etc.
Here is a video to show you how you can test your compression.
https://www.youtube.com/watch?v=PyCw4SiuT2I
Please report back your finds on compression.
**Second phase of diagnostics is to evaluate the ignition.
***Third phase of diagnostics is to evaluate the ignition.By putting the spark plug against the engine block is not adequate assessment of the health of the ignition system. You need to get a spark checker and gap it to at least 1/4 inch. The spark should be able to consistently jump the gap and be strong blue snapping spark.
Here is a bunch of information that you can read and do the repairs yourself and know what is going on.
Here is some information that will help you evaluate your ignition system with the flywheel popped off.
Harmonic balance flywheel puller video
https://www.youtube.com/watch?v=Nz1st4XnsX4
Your going to need to inspect your point, condenser and coils. They are located under the flywheel. Hopefully all you need to do is clean and regap your points and you might be in business. Still check your coils and condensers and plug wires.
Here are two link to show you how to test your coils and condensers.
http://www.youtube.com/watch?v=KT8rk5QWgS0
http://www.youtube.com/watch?v=l6eSXYmENDY
How to replace your coils, points and condenser. Please take digital pictures as you go, so it will help you return everything back in the right order. Keep cheap zip lock bags available to put your parts in so you don’t lose them. They are small.
Here is a diagram of a generic OMC (Johnson/Evinrudle/Gale) ignition assembly. You will have to remove the coil designated for the top cylinder and put the oil wicker in. It should be already be coated with a very light oil. (not grease). The purpose of the oil wicker is to lightly lubricate the outside riding surface of the cam so the point shoes do not prematurely wear. If you look at the points they have little shoes that ride along the cam. Please make sure the (breaker)points cam is on the correct side or the ignition will be out of timing. It should have the word top machine written on the side facing up.
FYI: You can only set(gap) one set of points at a time. Put the flywheel nut back on(turn with a wrench or ratchet clockwise) to allow you turn the crankshaft. (Please remove both spark plugs to make it easier to turn the crankshaft and prevent accidental starting)
You gap the point to 0.020 when the point shoes is at the top(high point of the cam). It should have a mark along with the word top. Then you will turn clockwise to the next set of point 180 degrees and set those points the same way. You will notice that the point of the previous set will be closed and when you come around again they will open up. *** When they are open no current is allow through. This is how you set your timing with the points.***
When you go to set the point’s gap. Very gently snug the anchor screw, then adjust the gap with adjusting screw and the feeler gauge until the feeler gauge is sliding through with slight resistance only. Then tighten the anchor screw. Repeat procedure with second set of points. Please make sure your hands are clean and the feeler gauge is clean, because oil on the points can foul them up and create resistance….poor or no no spark. ALways use a spark check to evaluate spark. It should jump minimum 1/4 inch. Blue sharp snappy spark.
Here is a picture of a spark check…Cheap $6
Here is a picture of how to tell which wire is going to the correct cylinder. Thanks to Garry for providing the picture on other post.
If your using the existing wires then cut about 1/4 inch of end going the coil, so you have clean un-oxidized copper contacting the spiking in the coil. Twist the end of the spark plug wire onto the coil spike. If you have replaced the wires, make sure they are 7mm copper metal core and not the automobile stuff.
***** Please make sure two things*****
1.) Make sure all the wires are tucked away under the flywheel and not rubbing up against the cam or crank, because with will eventually get damage and create a short, then no spark!!
2.) Make sure the coil heels (ends) are evenly lined up with the mounting boss.
Here are some pictures. (Compliments of JBJennings..nice fella)
Lining up the coil heel with the mounting boss prevent damage of the coils and the flywheel magnet, prevent rubbing as the flywheel turns.
*** Make sure the throttle is advanced to that start position***
Here is another picture that Garry (thanks Garry!!) supplied on another post with some modification.
Both diagrams, should answer your questions.
Here is some you tube videos that can help you diagnosis and properly setting your ignition and clean set your carburetor
Here a bunch of videos that can help you along. They are long and detail, but I purposely made them that way, so someone new to motors would feel comfortable. So, I apologize if they are boring. I originally made those videos to help a guy who had little mechanic knowledge.
Here is a link on how to remove a flywheel.
https://www.youtube.com/watch?v=Nz1st4XnsX4
Here is a bunch of links to evaluate and repair your ignition
If your looking for a help cleaning your points and testing your ignition, then here are some YouTube videos that can help.
Not professional videos, but they can help guide you through ignition diagnostics and repair. The motor in the video is a 1968 Johnson 6hp.
Hopefully will give you a visual and help you some.
Evinrude Gale and Johnson ignition video 1
https://www.youtube.com/watch?v=oTN8Ag_aj-8
Evinrude Gale and Johnson ignition video 2
https://www.youtube.com/watch?v=r7A6d8me0Gw
Evinrude Gale and Johnson ignition video 3
https://www.youtube.com/watch?v=ZAlT32NnTJ0
Evinrude Gale and Johnson ignition video 4
https://www.youtube.com/watch?v=re6FgcB_Yok
Evinrude Gale and Johnson ignition video 5
https://www.youtube.com/watch?v=ClGt6xHnb94
Evinrude Gale and Johnson ignition video 6
https://www.youtube.com/watch?v=taaSzp1Ev-0
Evinrude Gale and Johnson ignition video 7
https://www.youtube.com/watch?v=p7w0xW48YCU
Here is a bunch of links to help you with your carburetor.Here are some videos on how to clean and apply a carburetor kit for an OMC high speed fix jet carburetor. Displayed motors are 1968 Johnson 6hp and 1964 Evinrude 18hp outboards. The videos are very long and over detailed, but I want to help those who are new/novices to motor repair. Again, I am no expert or certified marine mechanic, but I am offering video to help.
OMC fix jet carburetors part 1 of 10 (Motor displayed 1968 Johnson 6hp)
https://www.youtube.com/watch?v=7MmDOaOQyQg
OMC fix jet carburetors part 2 of 10 (Motor displayed 1968 Johnson 6hp)
https://www.youtube.com/watch?v=PuByx8J-EfY
OMC fix jet carburetors part 3 of 10 (Motor displayed 1968 Johnson 6hp)
https://www.youtube.com/watch?v=FpivbGEv0wM
OMC fix jet carburetors part 4 of 10 (Motor displayed 1968 Johnson 6hp)
https://www.youtube.com/watch?v=-aWICvsQZQ8
OMC fix jet carburetors part 5 of 10 (Motor displayed 1968 Johnson 6hp)
https://www.youtube.com/watch?v=JqB6PLqeTI4
OMC fix jet carburetors part 6 of 10 (Motor displayed 1968 Johnson 6hp)
https://www.youtube.com/watch?v=HS5J_AxJrAY
OMC fix jet carburetors part 7 of 10 (Motor displayed 1968 Johnson 6hp)
https://www.youtube.com/watch?v=Iq_2RfWjQ28
OMC fix jet carburetors part 8 of 10 (Motor displayed 1968 Johnson 6hp)
https://www.youtube.com/watch?v=-lXIVBX_UF4
OMC fix jet carburetors part 9 of 10 (Motor displayed 1968 Johnson 6hp)
https://www.youtube.com/watch?v=-nA_4YmNgt8
OMC fix jet carburetors part 10 of 10 (Motor displayed 1968 Johnson 6hp)
https://www.youtube.com/watch?v=94lcU7y2P9Y
Almost forgot to post an accessory video regarding a timing fixture. You can certain set the points with a feeler gauge as shown in the previous videos, but I just wanted to add this to the list.
https://www.youtube.com/watch?v=eNK2TEeQQv0
Carburetor Adjustment for idle/low speed needle. Your carburetor has a high speed fix jet, so no adjustment. It just needs to stay clean.
Initial setting is: Slow speed = seat gently(turn in clockwise), then open 1-1/2 turns(turn out counter clockwise). Do not tighten or force the slow idle needle shut or it may damage the needle.
Start engine and set the rpms to where it just stays running. In segments of 1/8 turns, start to turn the S/S needle valve in (clockwise). Wait a few seconds (10 to 15 sec) for the engine to respond. As you turn the valve in(clockwise), the rpms will increase. Lower the rpms again (turn your throttle slightly slower) to where the engine will just stay running.
Eventually you’ll hit the point where the engine wants to die out or it will spit back (sounds like a mild backfire). At that point, back out(turn out counter clockwise) the valve 1/4 turn. Within that 1/4 turn, you’ll find the smoothest slow speed setting.
When you have finished the above adjustment, you will have no reason to move them again unless the carburetor fouls/gums up from sitting, in which case you would be required to remove, clean, and rebuild the carburetor anyway.
Thanks a lot! That all seems very helpful and if I have a bit more time to fiddle with the motor, I’ll be sure to go through these steps.
I’m thinking my best course of action would be return the motor though, there seems to be a few problems with it. I’m not adverse to fixing things, but with the exchange option, I think it might be a better bet for me.
Cory
-
AuthorPosts
- You must be logged in to reply to this topic.