Home › Forum › Ask A Member › UPDATE: 49 Sea King GG9014A – Drive Shaft Bushing Removal?
- This topic has 4 replies, 4 voices, and was last updated 9 months ago by
John Gragg.
-
AuthorPosts
-
February 11, 2024 at 4:47 pm #284848
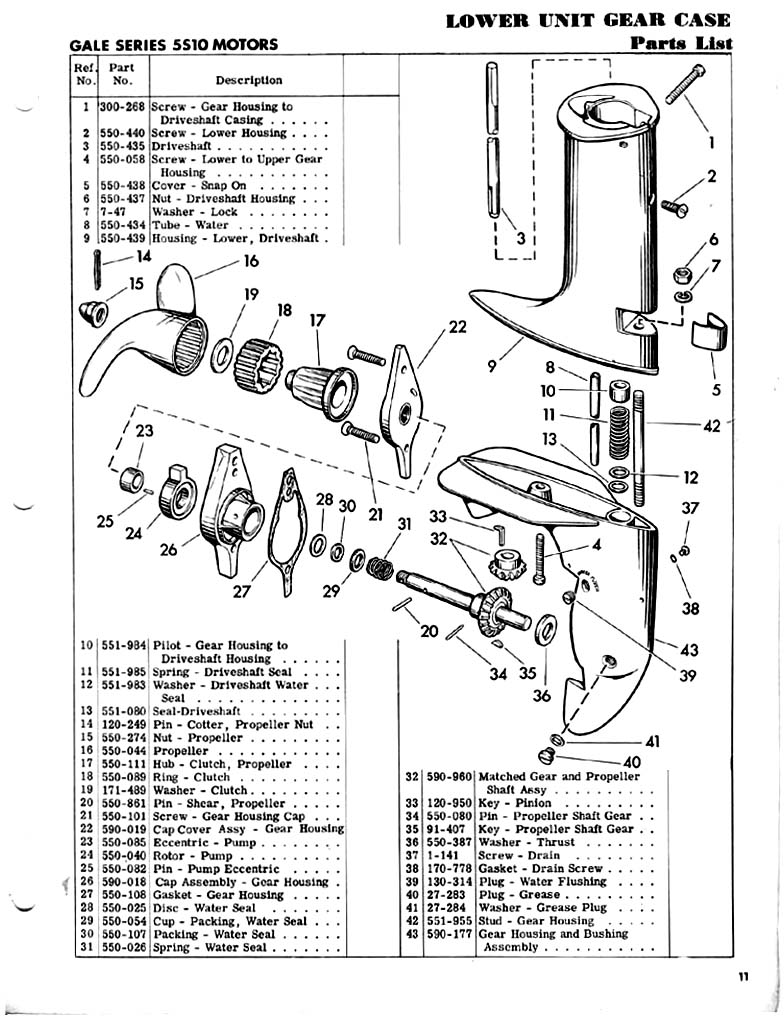
Does anyone have any experience with removing this bushing? There is a seal underneath (I have the new seal) that I would like to replace.
I have a blind seal puller set, but none of the shafts will fit into the ~1/2″ hole.
I thought about using a piece of fuel line and a bolt (like we do removing the brass sleeve in the TD Carburetors), but the amount of tension on the bushing is much greater (I think) than in the carb.
I’m already dousing with PB blaster, and plan to add heat, but if anyone knows the approved solution to removing this bad boy I would love to hear it.
When I first started in this group someone advised that (Paraphrasing) ‘those lowers are known for leaking, we just deal with it by keeping the correct lube in the lower and changing it regularly’, or something like that. I’m okay with that if that is what I have to do, but since I was able to source the seal, I would like to find a way to replace it. Also, the bushing is a little wallowed out, and I think I found a replacement at Ace Hardware. 1/2 x 3/4 x 1-1/8 brass bushing.
Thanks in advance
Best Regards,
John Gragg
RIverside, CAJust starting in the hobby, please be patient.
48 Sea King 5hp GG9014A
49 Sea King 5hp GG9014A
48 Johnson TD20
49 Johnson TD20
54 Johnson QD15
55 Johnson CD12February 11, 2024 at 7:59 pm #284850In the past I have used grease to remove brass bushings in crankshaft piolit clutch brass bushings & brass bushings in surgery tables.. Fill the cavity with grease & use a shaft to force the bushing out. I don’t know your app but this might work for you.
February 11, 2024 at 8:49 pm #284854I guess I was the let-er-leak guy. However, if I were determined to get it out, I suppose I would tap threads in it and use a bolt to pull it out. Interestingly, the following year the bushing was replaced with a spring assy. Looks like the spring assy would work in the older ones also. Gearcase is the same part number. 551080 seal is used in both
1 user thanked author for this post.
February 11, 2024 at 10:52 pm #284860Sometime you can rig up something to pull out a bushing with all thread,
spacers, and nuts.Prepare to be boarded!
1 user thanked author for this post.
February 28, 2024 at 9:21 pm #285393Update –
After fiddling around this bushing I realized that I had destroyed the seal and I now needed to ‘go for broke’ to salvage the gearcase.
I used my Dremel tool and cut two vertical slices out of the bushing, then put a pair of vice grips on the bushing and managed to get it out. No damage (believe it or not) to the gearcase! Yippie.
I already had a 1/2 x 3/4 x 1-1/8 bronze bushing ready to go. Went to ACE and picked up a few 1/2 x 3/4 x 1/16 brass washers and a spring to fit. (Per Franks drawing above). Everything went together very well. I doubled on the seals, installing back to back. Filled them with marine grease and checked everything for clearance issues. Found none.
I think this was one of the more beneficial ideas and information I’ve ever gotten from this site! None of the specified parts are available so Franks post helped immensely. I love it when substitutions can be sourced at a hardware store!
I also recently solved the driveshaft seal (upper part of the shaft) part #550788. The only thing I could find was a cork “seal” that in no way could possibly be the correct part. (Ebay)
I found a stout, thick O-ring that fits perfectly and is just tall enough to seal well against the exhaust tube housing. Size is 17mm x 11mm x 3mm if anyone is interested.
Thanks again for the assist!
Best Regards,
John Gragg
RIverside, CAJust starting in the hobby, please be patient.
48 Sea King 5hp GG9014A
49 Sea King 5hp GG9014A
48 Johnson TD20
49 Johnson TD20
54 Johnson QD15
55 Johnson CD12 -
AuthorPosts
- You must be logged in to reply to this topic.


