Home › Forum › Ask A Member › 1931 Johnson OA-55 – Phase 2
- This topic has 26 replies, 9 voices, and was last updated 1 month, 2 weeks ago by
 Tubs.
Tubs.
-
AuthorPosts
-
February 18, 2025 at 10:37 pm #294220

Pretty cold here right now but things could be warming up a bit next week. Not warm enough to put water in the barrel but maybe opening the door for some bench testing. Forecast that far out aren’t reliable. Could change to snow by then.
A "Boathouse Repair" is one that done without having tools or the skills to do it properly.
February 19, 2025 at 12:29 am #294221Tubs, it looks like you’ve made lots of progress! I’m curious, what’s the purpose behind this motor having 2 piston rings near the top of the piston and 1 more way below?
February 19, 2025 at 10:22 am #294226Cant say why they had the 3rd ring. Unless there are some documents around there is no way to know for sure . However we can speculate. My first guess would be controlling the fuel charge as the piston pass over the ports. Or possibly to improve crankcase pressure. Or maybe is to stabilize that heavy cast piston so it doesn’t rock in the cylinder. Or to keep oil between the upper and lower rings for better lubrication. This is early in engine design. Things were being tried only to be dropped as they didn’t really work as intended, cost didn’t justify the benefit, but most likely, same as today, engineers have to keep coming up with something different, no matter how well something works, if they want to have a job.
A "Boathouse Repair" is one that done without having tools or the skills to do it properly.
2 users thanked author for this post.
February 19, 2025 at 1:26 pm #294230.
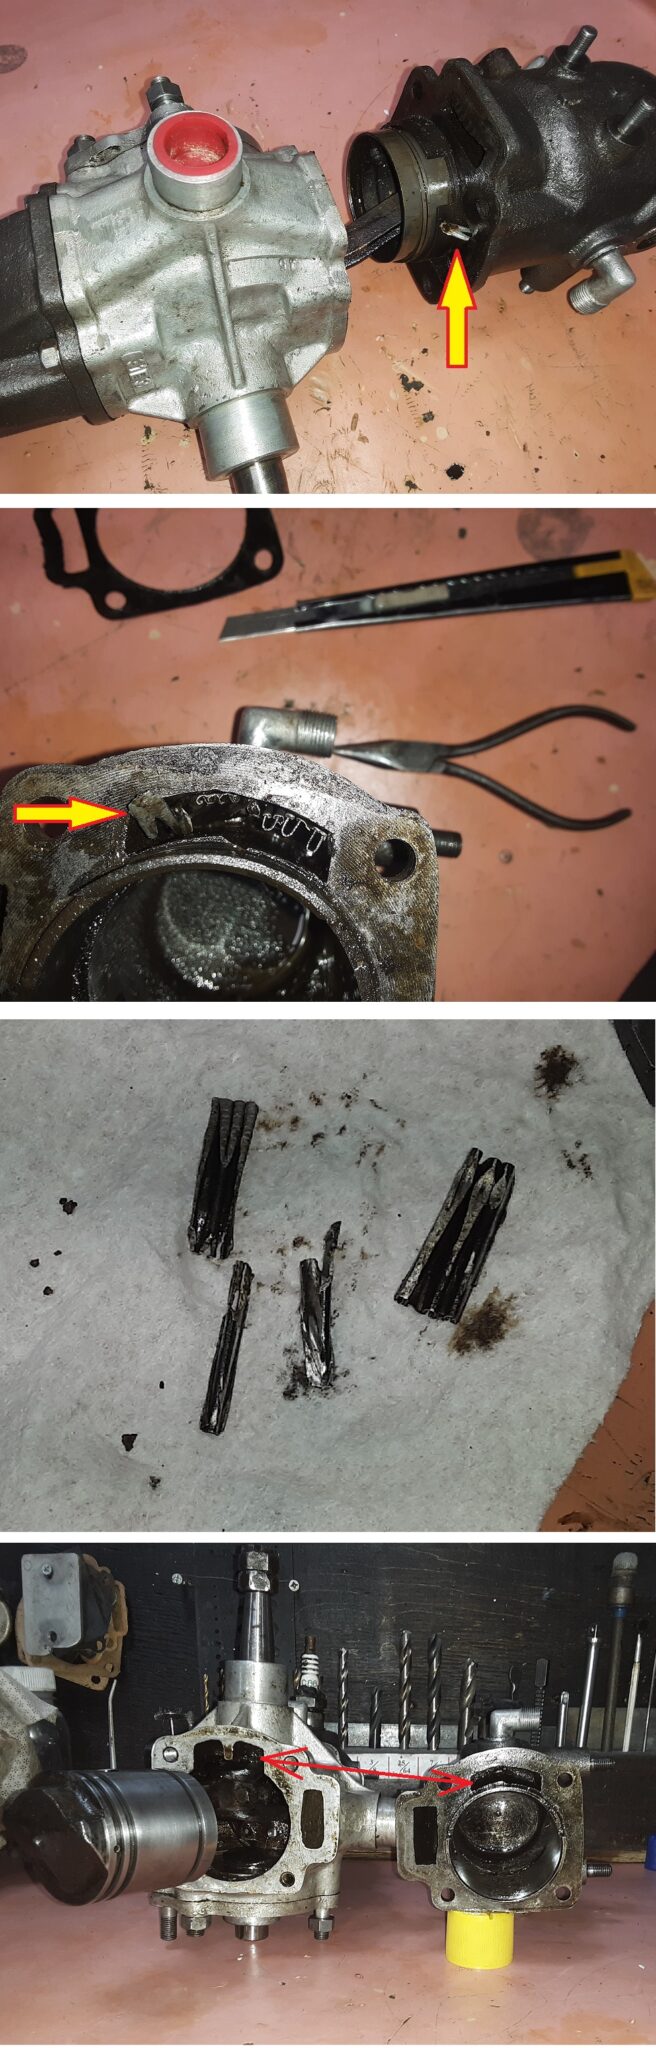
February 20, 2025 at 9:35 am #294239I posted the first power head pictures before I had removed this other cylinder. When I pulled it back there was a piece of the back fire suppressor sticking out. There was just enough of it remaining to keep it from going into the crankcase. This, and water pump key, would seem to indicate this motor had a death wish. Rings, same as the other side. Freed up pretty easily except for the top ring. Stuck in the area of the exhaust port. I broke it however. Except for having around .005 to .006 of taper, the cylinders look to be in good condition. With all this carbon I’m surprised there is 0 scoring of the pistons or cylinders.
A "Boathouse Repair" is one that done without having tools or the skills to do it properly.
February 20, 2025 at 12:03 pm #294253Good thing you decided to open up the crankcase – not much more run time and that back fire gizmo would have been down into the guts of the case. I wonder how many motors got destroyed by those suppressors.
Bob
1937 Champion D2C Deluxe Lite Twin
1954 Johnson CD-11
1955 Johnson QD-16
1957 Evinrude Fastwin 18
1958 Johnson QD-19
1958 Johnson FD-12
1959 Johnson QD-20“Every 20 minute job is only a broken bolt away from a 3-day project.”
"Every time you remove a broken or seized bolt an angel gets his wings."February 21, 2025 at 12:04 pm #294272I think this is my 5th or 6th Johnson with this power head. Didn’t have a reason the remove the cylinders in any of them. They have moved on so I can’t check if the back fire suppressor is still in any of them. I think if I get anymore of these I’ll slide at least one cylinder back far enough to check if they are still in there.
A "Boathouse Repair" is one that done without having tools or the skills to do it properly.
February 27, 2025 at 10:15 am #294351
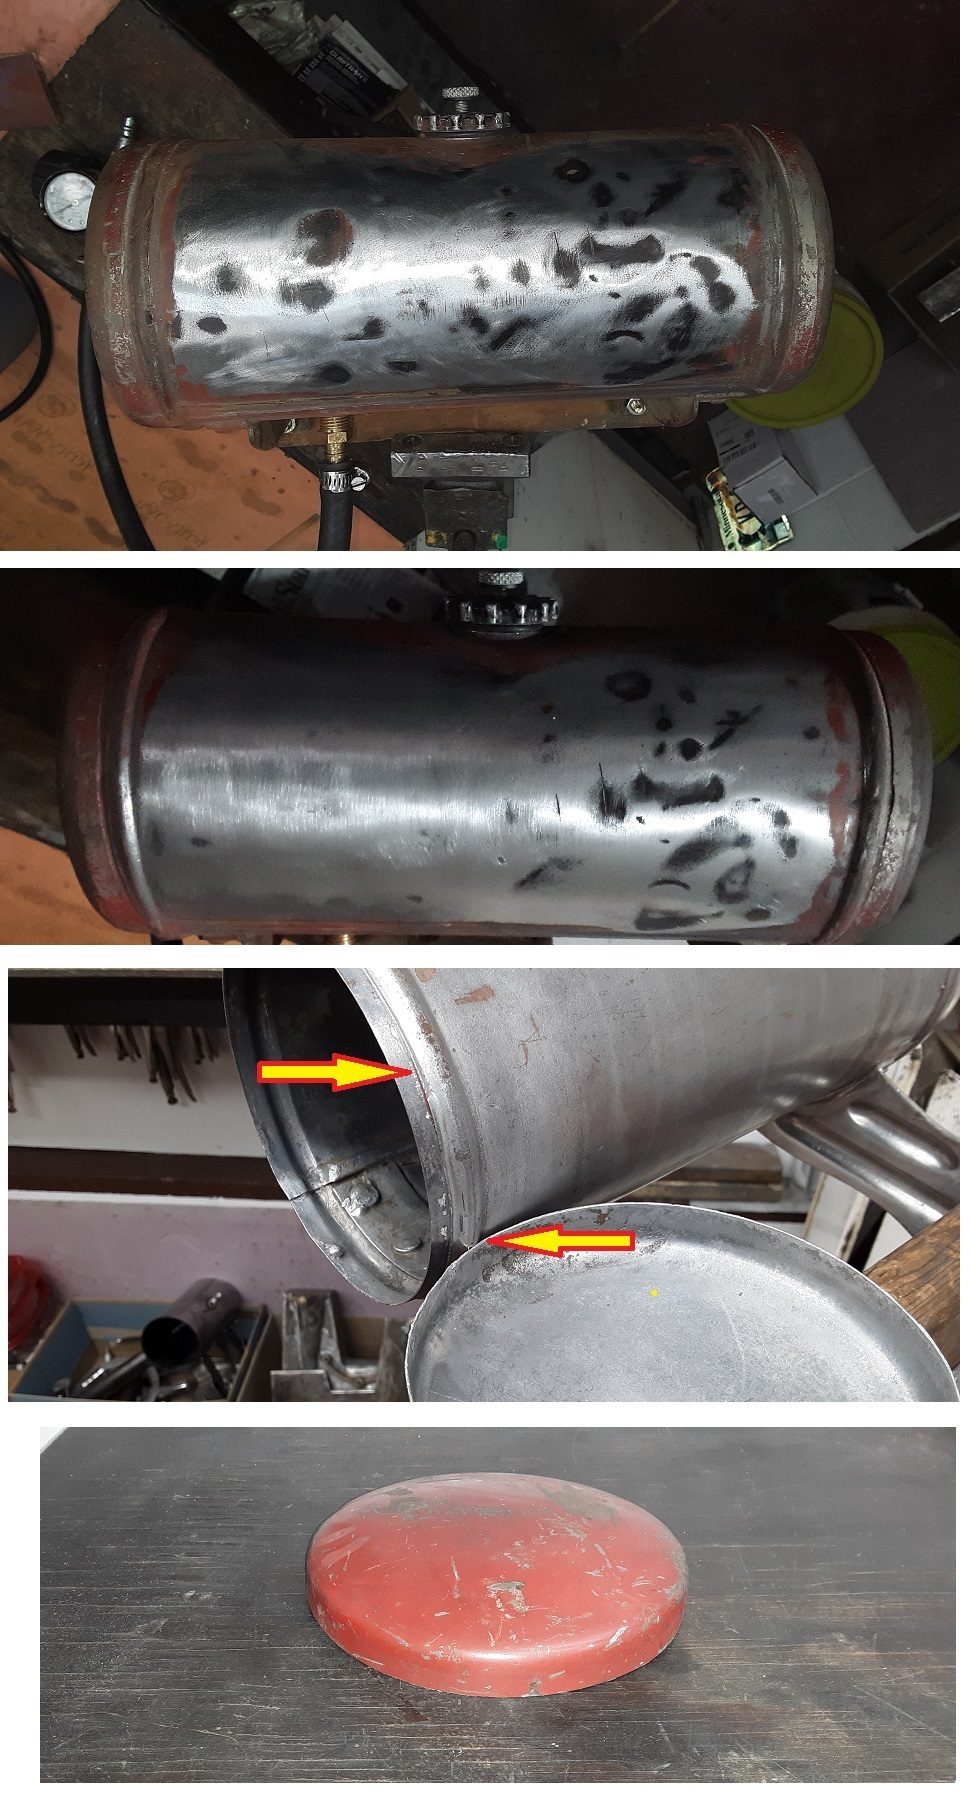
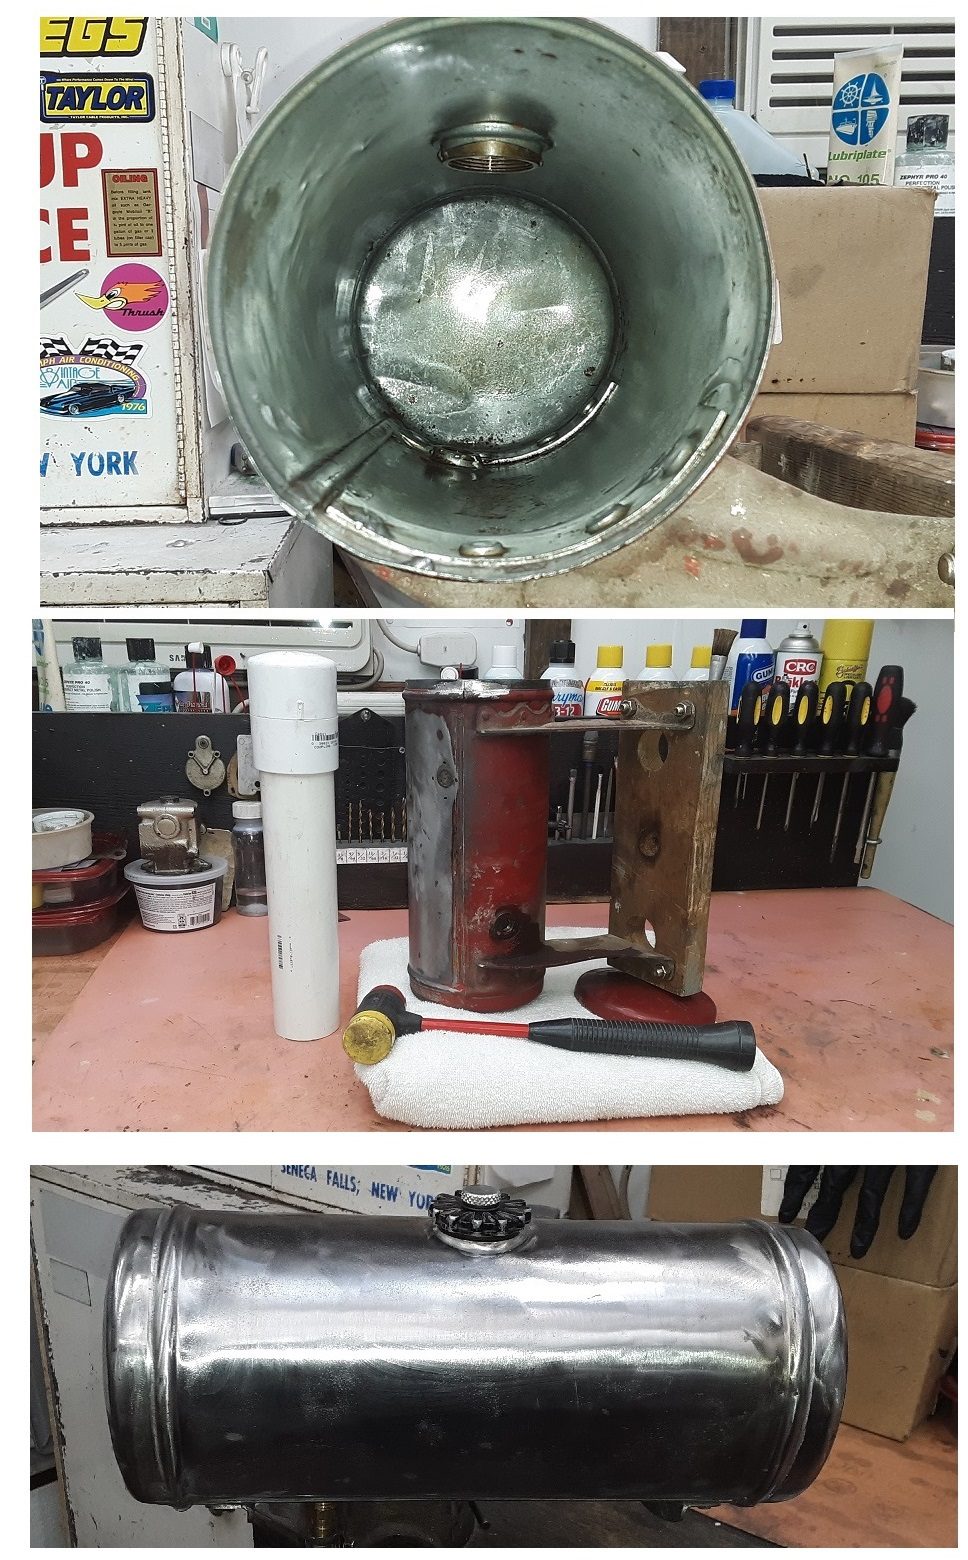
I went back and forth on weather to remove one of the end caps of the tank and decided not to. Working on the tank I got to the point where it wasn’t worth the time to remove what dents remained. This tank doesn’t need to be polished. Just needs a little filler. Wanted to see what I could do for the end caps. I aired up the tank and using a heat gun and my hammer, I began working on one end. Turns out that the only thing holding the end cap on was a little solder, just on the edge of the end cap. Apparently I got the cap hot enough that the solder let go. The end cap flew off, ending up on the floor, folded up like a taco. Don’t have a picture as I was somewhat concerned weather I would be able straighten it back out. The Boathouse repair took about an hour and a half. It’s close enough no one will noticed. Being that I now had one end open I began looking for something to use to straighten the cap on other end. The 2″ PVC pipe with a union and end cap, over a towel, worked well. The union and end cap were left over from a rear pinion seal install on my truck not too long ago. Now, having access to the inside of the tank, I wanted to work on the remaining dents a bit more before soldering the cap back on. There is a link to a video link for those who may be interested.
https://youtu.be/wEB_ZG23usA
A "Boathouse Repair" is one that done without having tools or the skills to do it properly.
February 27, 2025 at 3:23 pm #294357Yep this tank repair is just Tubs showing off again😂.
Seriously Tubs, the tank came out spectacular…and that’s without the paint and decal. You gave us all a masterclass on tank repair. Thanks for the great write up and video. Interesting find with the fire suppressors. I have never seen any in that bad of shape.
I have Callie 5 speed that backfired constantly. It turned out to be the mixture screw letting in too much air . Very spectacular I might add!
I suppose this motor might have been banging for a while to break them up? I’m sure you will figure it out once you get it into the barrel.
PS Don’t forget to throw the Cub in the barrel too. Can’t wait to see that run as well.Bob D
February 27, 2025 at 3:57 pm #294359Another great piece of work, Tubs. Well done.
Bob
1937 Champion D2C Deluxe Lite Twin
1954 Johnson CD-11
1955 Johnson QD-16
1957 Evinrude Fastwin 18
1958 Johnson QD-19
1958 Johnson FD-12
1959 Johnson QD-20“Every 20 minute job is only a broken bolt away from a 3-day project.”
"Every time you remove a broken or seized bolt an angel gets his wings." -
AuthorPosts
- You must be logged in to reply to this topic.