Home › Forum › Ask A Member › 1960s Evinrude 6 hp Fisherman
- This topic has 16 replies, 10 voices, and was last updated 10 years, 7 months ago by
mgsolakis.
-
AuthorPosts
-
August 7, 2015 at 1:12 pm #21640
Yes, but he has evidence that those parts are good. He had spark with the old plate, cam, and flywheel. He has spark with the new plate, old cam, and old flywheel.
On both he only has one cylinder sparking. The flywheel and cam are good, they are doing their job.If they are doing their job, why spend the time messing with them?
August 7, 2015 at 2:11 pm #21644I’m confused just reading this so I’m thinking that MG might be as well. Did you swap the flywheels or not? Perhaps you have mixed up the parts during the swap. In other words, you think you swapped a piece but really used the same one.
I would start from "square one" as others have suggested, rechecking/cleaning and adjusting all components. Did you check the coil air gaps? Perhaps the upper bearing/bushing on your 6hp is whooooped causing erratic point settings. Grounding the mag plate should not be an issue because it completes the high voltage secondary circuit only, but it surely couldn’t hurt to temporarily ground the mag plate to the block with a jumper lead.August 7, 2015 at 2:43 pm #21645I’ll try swapping those, who knows it may help. I’m not sure why the points would have moved by swapping the mag plate but I will check them as well. The plate does look a bit grimy so I will clean everything with electrical contact cleaner.
August 7, 2015 at 2:52 pm #21646Yes, the blown 6hp might have had good spark when it last ran, but the mag plate probably has collected dust/dirt/grime sitting around if its flywheel was off.
True, the points surely wouldn’t have moved on the mag plate, but their relationship to the different crank/cam/mag plate bushing might indeed be different.
My nickel says that once you clean everything up (points too) and check/readjust gaps, you will have good spark on both cylinders. Don’t forget to give the crankshaft the "wobble test" on the remote chance the upper bushing is worn.August 7, 2015 at 3:17 pm #21649mgsolakis, I put this together for a guy who was on another forum. The videos are not professional, but they are very detailed and long. They were original made to a help a guy that had little experience with motors. Please don’t think I am referring your abilities or skills. It was just easy to copy and paste this lump of information so I didn’t have to retype stuff up. It reviews coil assessment, ignition, and carburetor cleaning and assessment.
Hope this doesn’t seem like an over whelming amount of information. Gab a couple of beers and review the videos.
– There is a process for evaluating the motor. If you are willing to take guidance we can help you out to determine what is going on with your motor.
* First thing is to check the compression yourself. Most auto places will loan out a compression tester for a deposit and money is refunding when you return it. Napa, Auto Zone, O’Reilys…etc.
Here is a video to show you how you can test your compression.
https://www.youtube.com/watch?v=PyCw4SiuT2I
Please report back your finds on compression.
**Second phase of diagnostics is to evaluate the ignition.
***Third phase of diagnostics is to evaluate the carburetor.By putting the spark plug against the engine block is not adequate assessment of the health of the ignition system. You need to get a spark checker and gap it to at least 1/4 inch. The spark should be able to consistently jump the gap and be strong blue snapping spark.
Here is a bunch of information that you can read and do the repairs yourself and know what is going on.
Here is some information that will help you evaluate your ignition system with the flywheel popped off.
Harmonic balance flywheel puller video
https://www.youtube.com/watch?v=Nz1st4XnsX4
Your going to need to inspect your point, condensers and coils. They are located under the flywheel. Hopefully all you need to do is clean and regap your points and you might be in business. Still check your coils and condensers and plug wires.
Here are two link to show you how to test your coils and condensers.
http://www.youtube.com/watch?v=KT8rk5QWgS0
http://www.youtube.com/watch?v=l6eSXYmENDY
How to replace your coils, points and condenser. Please take digital pictures as you go, so it will help you return everything back in the right order. Keep cheap zip lock bags available to put your parts in so you don’t lose them. They are small.
Here is a diagram of a generic OMC (Johnson/Evinrudle/Gale) ignition assembly. You will have to remove the coil designated for the top cylinder and put the oil wicker in. It should be already be coated with a very light oil. (not grease). The purpose of the oil wicker is to lightly lubricate the outside riding surface of the cam so the point shoes do not prematurely wear. If you look at the points they have little shoes that ride along the cam. Please make sure the (breaker)points cam is on the correct side or the ignition will be out of timing. It should have the word top machine written on the side facing up.
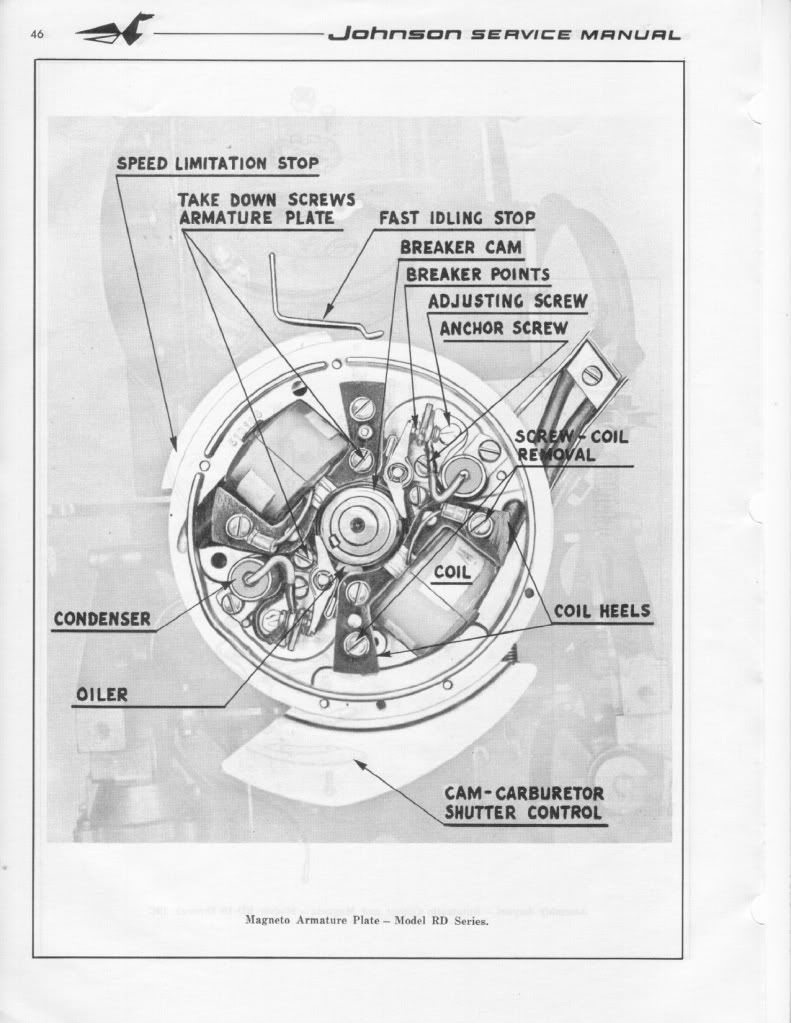
FYI: You can only set(gap) one set of points at a time. Put the flywheel nut back on(turn with a wrench or ratchet clockwise) to allow you turn the crankshaft. (Please remove both spark plugs to make it easier to turn the crankshaft and prevent accidental starting)
You gap the point to 0.020 when the point shoes is at the top(high point of the cam). It should have a mark along with the word top. Then you will turn clockwise to the next set of point 180 degrees and set those points the same way. You will notice that the point of the previous set will be closed and when you come around again they will open up. *** When they are open no current is allow through. This is how you set your timing with the points.***
When you go to set the point’s gap. Very gently snug the anchor screw, then adjust the gap with adjusting screw and the feeler gauge until the feeler gauge is sliding through with slight resistance only. Then tighten the anchor screw. Repeat procedure with second set of points. Please make sure your hands are clean and the feeler gauge is clean, because oil on the points can foul them up and create resistance….poor or no no spark. ALways use a spark check to evaluate spark. It should jump minimum 1/4 inch. Blue sharp snappy spark.
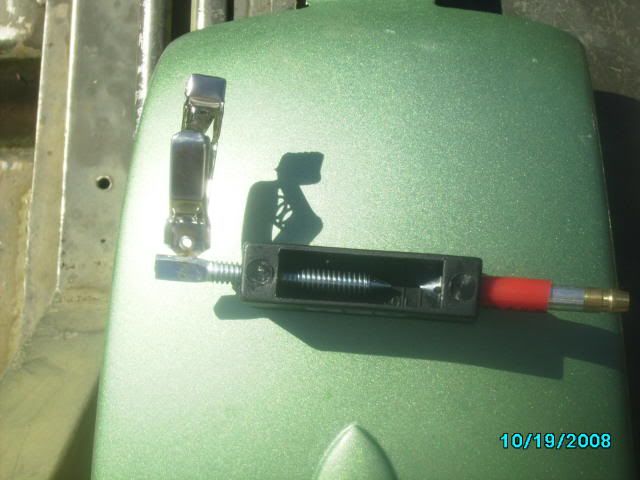
Here is a picture of a spark check…Cheap $6
Here is a picture of how to tell which wire is going to the correct cylinder. Thanks to Garry for providing the picture on other post.
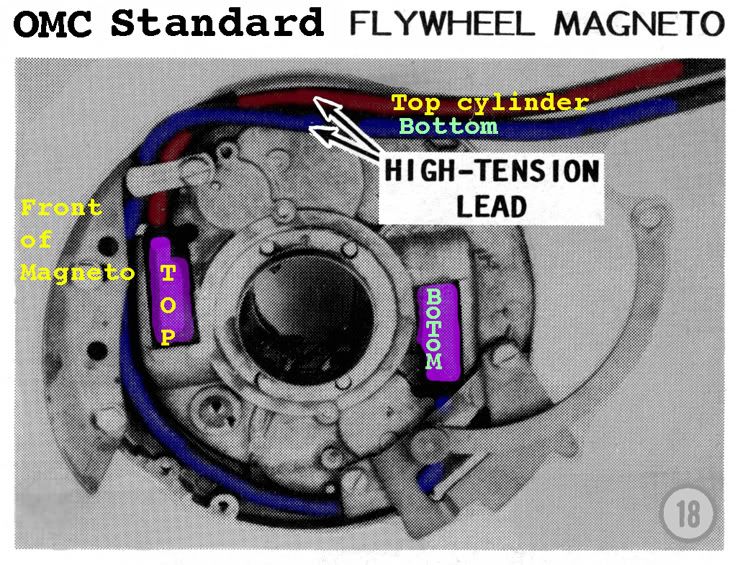
If your using the existing wires then cut about 1/4 inch of end going the coil, so you have clean un-oxidized copper contacting the spiking in the coil. Twist the end of the spark plug wire onto the coil spike. If you have replaced the wires, make sure they are 7mm copper metal core and not the automobile stuff.
***** Please make sure two things*****
1.) Make sure all the wires are tucked away under the flywheel and not rubbing up against the cam or crank, because with will eventually get damage and create a short, then no spark!!
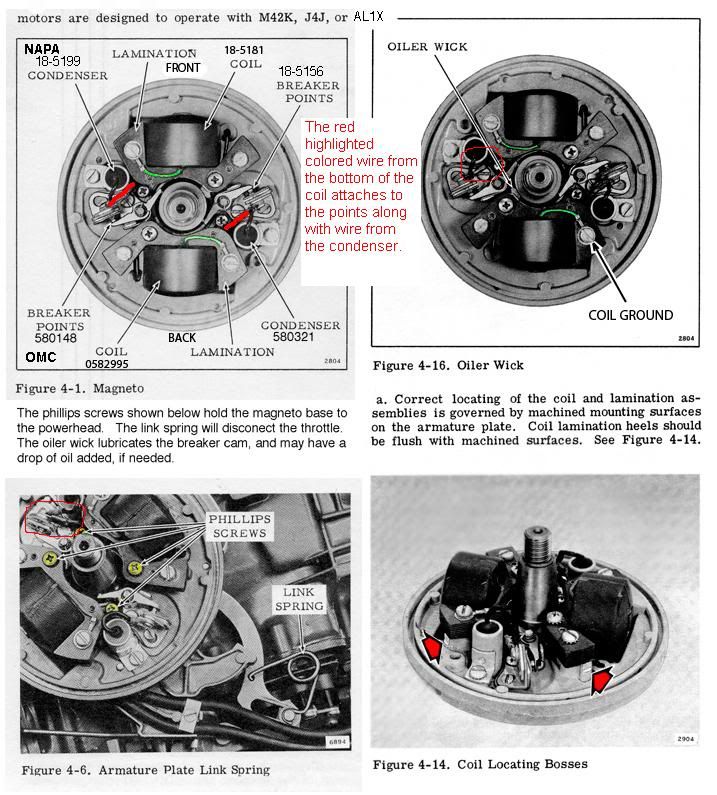
2.) Make sure the coil heels (ends) are evenly lined up with the mounting boss.
Here are some pictures. (Compliments of JBJennings..nice fella)


Lining up the coil heel with the mounting boss prevent damage of the coils and the flywheel magnet, prevent rubbing as the flywheel turns.
*** Make sure the throttle is advanced to that start position***
Here is another picture that Garry (thanks Garry!!) supplied on another post with some modification.
Both diagrams, should answer your questions.
Here is some you tube videos that can help you diagnosis and properly setting your ignition and clean set your carburetor
Here a bunch of videos that can help you along. They are long and detail, but I purposely made them that way, so someone new to motors would feel comfortable. So, I apologize if they are boring. I originally made those videos to help a guy who had little mechanic knowledge.
Here is a link on how to remove a flywheel.
https://www.youtube.com/watch?v=Nz1st4XnsX4
Here is a bunch of links to evaluate and repair your ignition
If your looking for a help cleaning your points and testing your ignition, then here are some YouTube videos that can help.
Not professional videos, but they can help guide you through ignition diagnostics and repair. The motor in the video is a 1968 Johnson 6hp.
Hopefully will give you a visual and help you some.
Evinrude Gale and Johnson ignition video 1
https://www.youtube.com/watch?v=oTN8Ag_aj-8
Evinrude Gale and Johnson ignition video 2
https://www.youtube.com/watch?v=r7A6d8me0Gw
Evinrude Gale and Johnson ignition video 3
https://www.youtube.com/watch?v=ZAlT32NnTJ0
Evinrude Gale and Johnson ignition video 4
https://www.youtube.com/watch?v=re6FgcB_Yok
Evinrude Gale and Johnson ignition video 5
https://www.youtube.com/watch?v=ClGt6xHnb94
Evinrude Gale and Johnson ignition video 6
https://www.youtube.com/watch?v=taaSzp1Ev-0
Evinrude Gale and Johnson ignition video 7
https://www.youtube.com/watch?v=p7w0xW48YCU
Here is a bunch of links to help you with your carburetor.Here are some videos on how to clean and apply a carburetor kit for an OMC high speed fix jet carburetor. Displayed motors are 1968 Johnson 6hp and 1964 Evinrude 18hp outboards. The videos are very long and over detailed, but I want to help those who are new/novices to motor repair. Again, I am no expert or certified marine mechanic, but I am offering video to help.
OMC fix jet carburetors part 1 of 10 (Motor displayed 1968 Johnson 6hp)
https://www.youtube.com/watch?v=7MmDOaOQyQg
OMC fix jet carburetors part 2 of 10 (Motor displayed 1968 Johnson 6hp)
https://www.youtube.com/watch?v=PuByx8J-EfY
OMC fix jet carburetors part 3 of 10 (Motor displayed 1968 Johnson 6hp)
https://www.youtube.com/watch?v=FpivbGEv0wM
OMC fix jet carburetors part 4 of 10 (Motor displayed 1968 Johnson 6hp)
https://www.youtube.com/watch?v=-aWICvsQZQ8
OMC fix jet carburetors part 5 of 10 (Motor displayed 1968 Johnson 6hp)
https://www.youtube.com/watch?v=JqB6PLqeTI4
OMC fix jet carburetors part 6 of 10 (Motor displayed 1968 Johnson 6hp)
https://www.youtube.com/watch?v=HS5J_AxJrAY
OMC fix jet carburetors part 7 of 10 (Motor displayed 1968 Johnson 6hp)
https://www.youtube.com/watch?v=Iq_2RfWjQ28
OMC fix jet carburetors part 8 of 10 (Motor displayed 1968 Johnson 6hp)
https://www.youtube.com/watch?v=-lXIVBX_UF4
OMC fix jet carburetors part 9 of 10 (Motor displayed 1968 Johnson 6hp)
https://www.youtube.com/watch?v=-nA_4YmNgt8
OMC fix jet carburetors part 10 of 10 (Motor displayed 1968 Johnson 6hp)
https://www.youtube.com/watch?v=94lcU7y2P9Y
Almost forgot to post an accessory video regarding a timing fixture. You can certain set the points with a feeler gauge as shown in the previous videos, but I just wanted to add this to the list.
https://www.youtube.com/watch?v=eNK2TEeQQv0
Carburetor Adjustment for idle/low speed needle. Your carburetor has a high speed fix jet, so no adjustment. It just needs to stay clean.
Initial setting is: Slow speed = seat gently(turn in clockwise), then open 1-1/2 turns(turn out counter clockwise). Do not tighten or force the slow idle needle shut or it may damage the needle.
Start engine and set the rpms to where it just stays running. In segments of 1/8 turns, start to turn the S/S needle valve in (clockwise). Wait a few seconds (10 to 15 sec) for the engine to respond. As you turn the valve in(clockwise), the rpms will increase. Lower the rpms again (turn your throttle slightly slower) to where the engine will just stay running.
Eventually you’ll hit the point where the engine wants to die out or it will spit back (sounds like a mild backfire). At that point, back out(turn out counter clockwise) the valve 1/4 turn. Within that 1/4 turn, you’ll find the smoothest slow speed setting.
When you have finished the above adjustment, you will have no reason to move them again unless the carburetor fouls/gums up from sitting, in which case you would be required to remove, clean, and rebuild the carburetor anyway.
August 7, 2015 at 6:48 pm #21660check the pin on the coil that connects to the ignition wire.The cignition coil can look good,but if there is corrosion on the pin or the pin cracked off in the ignition wire you will have intermittent or no spark…..and kudos to cajuncooki for his videos.They are good to watch whether you are a first timer or have given new life to a hundred old motors.He put some time,thought, and effort into his videos and should be applauded for it.They are well worth viewing.
August 8, 2015 at 2:24 am #21683Wow, what a great set of videos. Thanks for that. I’ll use some of the tips here and get back to you with an update.
-
AuthorPosts
- You must be logged in to reply to this topic.