Home › Forum › Ask A Member › Gear Case too tight after assembly
- This topic has 19 replies, 11 voices, and was last updated 9 years, 3 months ago by
 johnny-infl.
-
AuthorPosts
-
December 30, 2015 at 11:56 pm #3298
I used the search feature and did not find this particular issue.
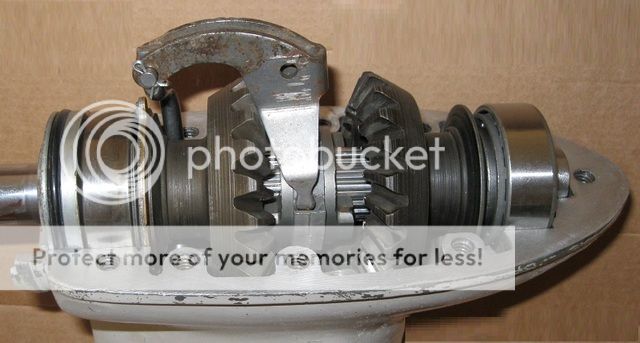
Upon overhaul of the gear case to a ’66 33hp Johnson, I checked, checked and double checked
again and again to ensure every part was in its correct place. (using the parts manual and my photos).
Applied the sealant, connected the shifter and closed it all up with the bolts only hand tight.
The prop shaft was very hard to turn. Could not turn it by hand, I had to put a screwdriver in
the prop nut hole….. I panicked and took it all apart and cleaned it up before the sealant set up.
I could only imagine how much tighter it would be after putting the torque wrench on it.Now, The prop turned freely before disassembly. I only lightly lapped the mating surfaces.
with the assembly just sitting in the casting, it turns somewhat freely by hand.
Is it normal for new seals to hold this tight ?
I will go fishing tomorrow and give it another try Friday.
Thanks
I need to feel confident and comfortable I am doing it right before putting the case together
for the 40hp that is next in line..
December 31, 2015 at 1:09 am #29421Does that motor have a bearing under(above) the pinion gear? I would think that the pinion lash is too tight. If you remove the pinion and screw the case together dry, and it turns then that would tell you if it is the pinion or the prop shaft that is binding.
December 31, 2015 at 1:45 am #29425My first thought was pinion also. Did you have the pinion bearings out? If so, did you put the flat thrust washers back in their proper position (they are slightly different). Lessee, if I get this right, the smaller one with smaller ID goes against the gear. I really don’t know what happens if you swap them because I’ve never done it.
December 31, 2015 at 1:49 am #29426Am thinking you didn’t get the locator pin in the bushing/housing correctly. If the propshaft turned freely before the tightening process and not after then this probably happened.
December 31, 2015 at 2:24 am #29429Me two Pappy,
Something is out of alignment. Remove the propshaft & look at the bearing supports that cradle the shaft. It should have a small hole in the bearing carrier. Next find the pin in the case & hope you haven’t pushed it in to the case as the pin fits the carrier to secure it.
P.S. NEVER assemble anything that dry. The 105 grease will not get everywhere, Just paint it on to get some lube everywhere. Doesn’t take much just a film of it on the splines.January 1, 2016 at 3:32 pm #29513Thanks one and all for the precautions and great information.
I am pretty embarrassed to say, but, a few posts back (don’t remember what thread)
I talked about pounded out the brass bushing from the forward gear,
#1 issue: I was using the Prop Shaft and hammer to get it out……..
It seems I deformed the butt end just enough to make it bind in the carrier.
#2 issue: I did use some gear oil so not to install anything dry.
But, this my first actual total overhaul of any gear case, and I have assembled
and disassembled the arrangement a dozen times to make sure I have everything
in its correct place…… Also, I have the gear case from a ’60 40hp on the table also.
Sort of cleaning and such together……. In my golf ball sized brain, On one assembly,
I could not find a missing Thrust Washer so I reached over and got one out of the 40hp
tray of parts, knowing the missing washer will turn up after I clean off the work table.
Not knowing that the original Thrust Washer was "stuck" in place from the oil in the gear and I did not see it.SOOOOOOOOOOOO – – – With a deformed shaft and a double washer, it is a wonder anything fit at all.
filed down the shaft butt as true as I cold get it, polished with Wet-n-Dry paper, assembled everything
with a brush of oil, tightened all bolts, the shaft turns normal and true. Torqued the bolts down to 13 foot pounds,
everything still turns free as it should, with some resistance from the new oil retainer seal.So, after I calm down from being so aggravated at my OWN stupid mistakes, I will CLEAN OFF THE WORK TABLE,
double check everything again, part by part, reassemble with 847 Sealant and new spaghetti seal and be done with it.
Then, do the same with the 40hp . . . . GGGRRRRRrrrrrrr I could spit grapes !!!Hope everyone has a Happy, Prosperous and Safe 2016 !!
.
January 1, 2016 at 4:06 pm #29514Look at it this way Johnny. Some of the BEST lessons I have learned over the years from restoring many, many classic cars, Harleys, and of late boat motors have come from MY OWN MISTAKES. Screwing up is a very valuable teacher. I learn more from my own two hands taking things apart and putting them back together (sometimes more then once) then reading most "how to books", manuals, or internet postings. I just think better with my eyes and hands and my brain is just along for the ride most times. I never consider it a screw up IF I learned from it.
Best to you in the new year.
WannabeJanuary 1, 2016 at 4:06 pm #29515Welcome to outboard repair, I can honestly chuckle because I think I can speak for most of us as most of us have made similar "silly" mistakes…Take it with a grain of salt, remember it and move on. Glad problem is resolved.
Regards
Richard
http://www.richardsoutboardtools.com
classicomctools@gmail.comJanuary 1, 2016 at 4:28 pm #29516Torques……..In general a 1/4" fastener should be in the range of 5-7ft/lbs. on our outboards.
January 1, 2016 at 4:55 pm #29519Thanks for the kind words – LOL – yes, I have had my fair share of mishaps
on some old cars I have restored in the past. But, that was before the interweb
where you could find qualified and professional help for just about anything.
Pap, I was going by a 1968 Johnson Service Manual for the torque setting.
and yes, I thought it seemed a little high also. The standard 1/4" fasteners
calls for the same 5-7 ft/lbs . . . so with final assembly and the teflon antisieze,
I will go with the 7 ft/lbs, let it sit for 24 hours then do the pressure test.
Finished the carb rebuild and that was non problematic. Hopefully I can do
the compression and spark tests next week.WHEN I get my new RDS-20, hopefully I won’t break anything on it before I get
it put on a boat !! LOL LOL -
AuthorPosts
- You must be logged in to reply to this topic.