Home › Forum › Ask A Member › Help with 65′ Evinrude Fisherman 6HP
- This topic has 94 replies, 16 voices, and was last updated 8 years, 3 months ago by
bakercheese.
-
AuthorPosts
-
February 25, 2018 at 2:18 am #9296
Hey y’all first time posting here! Pulled an old engine out a couple years ago got it running and then not long after stopped getting spark to the top cylinder, pulled it back out the other day and figured I’d get it going again. After replacing all the magneto components and watching a YouTube video on how to disassemble diagnose and repair I realized I’m missing what’s called the Oiler Wick Clip, after contemplating just glueing it in place with gorilla glue or coughing up the outrageously pricey 35$ for the miniscule piece of metal, I decided to make what I’m assuming is the right decision and go ahead pay for the clip. My question is if there are two one on each side or just one on the upper piston side? Also any tips for setting the points (seems simple enough) and tuning the engine as well as how to put the flywheel back on would be very much appreciated!!!
February 25, 2018 at 2:38 am #71562Gosh, I’m sure we can come up with the oiler wick holder without having you shell out big bucks. If Ed Elliot sees this, I’ll bet he can take care of you. And yes, there is only one wick required. You can set your points if you use a .020 feeler gauge to carefully measure the gap while on the ”high”side of the cam, usually marked as such. The flywheel will need to be torqued to spec. Someone will post that, as I don’t remember off hand..
I know I continually harp on not using Sierra Points, but I would recommend only using BRP Johnson Evinrude points and condensors.February 25, 2018 at 3:41 am #71566Thanks for the quick reply Jerry! Unfortunately I already bought 2 of em from marineengine.com because I’m trying to get it back on the water asap lol, I wouldn’t mind getting in touch regardless for parts in the future though as I’m going to have the engine pretty much forever and I’m sure this won’t be the last time I need something obscure lol. SWEET 😀 thanks for the info!! I thought so but wasn’t 100% sure, I’m not sure about the torque either but I think its 40foot pounds if someone else could chime in that’d be great. I actually bought both (just for shits and giggles) a set of BRP and Sierra points and condensers, installed the BRP Points and condensers and Sierra coils. Also is there any service that needs to be done to the fuel pump or anything else? Changed lower end oil, did the impeller and a carb kit last time it was running.
February 25, 2018 at 3:45 am #71567http://www.youtube.com/watch?v=ga1Cjymj … e=youtu.be
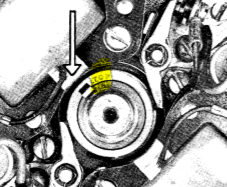
the picture shows the TOP section (high point) where the point rubbing block should centered be for a basic adjustment of the gap at.020
the voltmeter method is more accurate (utube video)
and the Richard White sold tool is the easiest and most accuratepoints should…. just open as measured with an ohmmeter with pointer between the bars
https://www.youtube.com/watch?v=eNK2TEeQQv0&t=32ssee link/story on OMC cheapy fuel pumps
https://aomci.org/forum/viewtopic.php?f=2&t=15030coils cheap..
https://www.ebay.com/itm/2xIGNITION-COI … 2592241227
Attachments:

Joining AOMCI has priviledges 🙂
February 25, 2018 at 1:21 pm #71578Flywheel nut torque is 40-45 foot pounds
February 25, 2018 at 1:26 pm #71579Flywheel nut torque is 40-45ft.lbs. Set the points when the rub block is aligned with the flywheel key, not the word "top" on the cam. "Top" merely means that the top of the cam is up (so you don’t install it upside down.
February 25, 2018 at 1:49 pm #71582this came up before and I, wrongly maybe, have used the TOP section… to no ill effects (motors run ok) I always felt that (looking ) \TOP/ created the widest gap position recommended which I would then set at 20
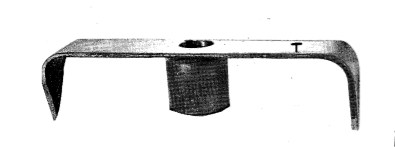
the tool itself shows that the KEY does not line up with the tool’s pointy arrow and is offset by maybe… 15 degrees indicating it does not use the key itself as the high point for the rubbing block.
is this why the gap itself needs to…just begin to open when the tool is used,,,that being the firing point on the plugs….leaving the point gap to continue "widening as it reaches the TOP marking ????
btw I am now using the tool 🙂
Attachments:
Joining AOMCI has priviledges 🙂
February 25, 2018 at 6:26 pm #71598I don’t think it’s the end of the world if the wick is missing as older vehicles with points went for thousands and thousands of miles with just a light coating of grease on the cam. Periodic resetting or replacement of the points is mandatory anyway.
February 25, 2018 at 6:49 pm #71601Thanks for sharing the video crosbyman! I’ll set them using a feeler to start and then use either the YouTube method or I might improvise with something similar to Richard’s tool which is used in this video if I’m now mistaken?
https://youtu.be/eNK2TEeQQv0
Both seem to be very accurate just much easier with his tool so you don’t have to repeatedly pull and install the flywheel over and over.
Overall between both the videos and cajuncookones 7 parter I think I’ve got a really good hang of what I’m going for.
I just haven’t seen someone put the flywheel back on or know the torque specs?February 25, 2018 at 7:02 pm #71603Much appreciated FrankR and indy46!!! Thanks for the final torque specs and speedy response! Im pretty sure top is the widest point just by looking at it and from everything I’ve gathered crosbyman is correct (for my engine at least) nonetheless the idea is to have the circuit open (points not touching) until the Top or Bottom Mark on the flywheel passes directly between the two marks on the armature at the exact right time for BOTH top and bottom cylinders if I’m not mistaken.
-
AuthorPosts
- You must be logged in to reply to this topic.